Used plastic water barrel planters are large enough to be used for fruits and vegetables. Look for them locally and follow these steps to make your own.

In a recent article, I wrote about making no build garden tubs and there was quite a bit of interest. Many of you reached out with questions about how – and what – I was going to do with the blue water barrels that I mentioned.
I’ve decided to cut them in half and use them as large garden planters. This article shows you how to cut barrels to make some yourself.
Using Plastic Barrels as Planters
Be aware, this may not be cost-effective for you to go out and purchase new barrels for this project. We received these free from a friend who was moving and after toting them around for a few years we decided to be realistic – they were not going to be used for water storage so they might as well serve a useful purpose.
Also, if you do find used barrels for a good price, make sure that they have stored food in them and not chemicals, which will leach into the plastic and eventually your soil. If you wouldn’t eat or drink the prior contents, pass them up.
I’ve found that using large barrels as raised beds has several advantages over in-ground row planting:
- They make excellent use of your available space.
- They are easy to plan and layout.
- Raised beds are ideal for gardeners with mobility issues or who simply want to prevent wear and tear on their backs and joints
- They are more productive than rows because the soil remains loose.
- You’re also able to correct soil imperfections such as poor drainage or the lack of certain nutrients.
- And since the plants are close together, the soil stays shaded and cool and weeds are less likely to develop.
- It’s easy to add a simple, drip irrigation system.
You can see why this can be a popular choice for small space gardeners. Although there is an initial investment of time and energy, it pays off quickly in fresh produce and time spent outdoors.
Tools Needed for This Project
- 1 Plastic, food-grade, barrel
- Tape Measure
- Permanent Marker
- Hand Drill
- 1/4 inch drill bit
- Sawzall Reciprocating Saw, hacksaw, or skill saw with a fine-tooth blade
Instructions to Make Plastic Water Barrel Planters
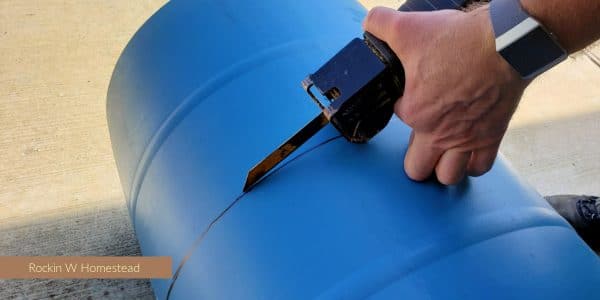
Measure the halfway point of your barrel and make a mark with the permanent marker. Make a mark every 4 to 6 inches around the entire barrel.

Use a six-inch piece of cardboard, or another bendable straight edge item, to connect the marks you made on the barrel. You’ll end up with one solid black line to use as a cutting guide.

Using a Sawzall reciprocal saw, cut into the barrel, rotating it as you cut around. This can also be accomplished by hand using a hacksaw or using a cordless Skilsaw with a fine-tooth blade.
Once you have the pieces cut in two, make 1/4 inch drainage holes in the bottom of the new planters.

Fill the barrel halves with a mixture of garden soil, peat moss, and vermiculite then plant as usual. Use one of these container planting mix recipes to get started.
Maintaining a Container Raised Bed Garden
Container gardens need some extra effort to produce a harvest year after year. Follow these easy steps each spring and fall and you’ll have a productive small space garden that fits your needs.
- Work some organic matter, such as compost, into the containers at the beginning of each season.
- Since the space is small, you can use a hand shovel or fork to aerate the soil and prevent compaction.
- Be sure to give your container garden extra water, they will tend to dry out faster in hot weather.
After several years dump the soil into your compost pile and start again with a mix of fresh garden soil, compost, peat moss, and vermiculite.

Leave a Reply